
DockingPie Tutorial: Molecular Docking in PyMOL

DockingPie is a free, open source PyMOL plugin that runs Smina, AutoDock Vina, ADFR and RxDock from a graphical interface. You prepare the receptor and ligand, set a search box, dock and read affinities without typing a command. Its consensus tab then compares poses across engines.
This guide is part of our molecular docking pillar and our computational biology skills roadmap, written by the StemSkills Lab team, who have spent more than 10 years in sequence and structural bioinformatics, drug discovery and design, and multiscale molecular modeling.
Most students meet docking through a terminal. You install AutoDock Vina, write a config file, guess at a grid box, and the first thing you see is a text file of numbers with no structure attached to them. DockingPie removes that gap. Every step happens in a tab next to the PyMOL viewer, so the receptor, the search box and the docked pose are visible while you set them. Every label, button and parameter named below was checked against the official DockingPie User’s Guide, version 1.0.1, on 4 October 2026.
What is DockingPie and who is it for?
DockingPie is a PyMOL plugin for individual and consensus docking, released in 2022 by Serena Rosignoli and Alessandro Paiardini at the Department of Biochemical Sciences “A. Rossi Fanelli”, Sapienza University of Rome. It is distributed under the GPL-3.0 licence, and the source is on GitHub.
The method paper is Rosignoli S, Paiardini A. DockingPie: a consensus docking plugin for PyMOL. Bioinformatics 2022;38(17):4233-4234 (DOI 10.1093/bioinformatics/btac452). Europe PMC recorded 63 citations of that paper when we checked on 4 October 2026, so this is a tool with a real user base behind it rather than an abandoned side project.
It suits you if you already open PyMOL to look at structures, you are on syllabus step four (docking), and you want to see what you are doing. It suits you less if you need to screen thousands of compounds, because the interface is built around setting up a run you can inspect, not around unattended batch throughput.
The plugin supports four docking engines: Smina, AutoDock Vina, ADFR and RxDock. It does not include AutoDock4 as a separate engine, so if a tutorial tells you to pick AutoDock4 inside DockingPie, that tutorial is describing something else.
How do you install DockingPie in PyMOL?
Installation is the standard PyMOL plugin route and takes about two minutes on an incentive PyMOL build.
- Download the plugin ZIP from the DockingPie repository. Do not unzip it.
- In PyMOL, open Plugin then Plugin Manager.
- Click Install New Plugin, press Choose File… and select the ZIP you downloaded.
- Accept the default installation directory. The guide states that the location of the plugin files makes no difference when running the plugin.
- Open the plugin from Plugin, then install the external tools from the CONFIGURATION tab: Configure, then Start Download, then Finish Download, then the Install button.
The requirements are Python 3 and PyMOL 2.3 or higher. The repository is more precise: incentive PyMOL 2.3.4 or above, open source PyMOL 2.3.0 or above. If you do not have PyMOL yet, start with our guide on how to install PyMOL for free.
The external tools it pulls in are AutoDockTools, OpenBabel, sPyRMSD and sdsorter. On an open source PyMOL build the Conda package manager is not integrated, so the guide is explicit that RxDock, sPyRMSD and OpenBabel have to be installed by hand with conda install, and that Biopython is often missing too and will block the plugin from opening at all.
The developers list 12 tested combinations of PyMOL version, operating system and PyMOL source in the guide, covering Ubuntu 18.04 through 21.04, Windows 10 Home and Pro, and macOS from High Sierra to Monterey. If your setup is not on that list the plugin may still work, it simply has not been verified by them.
Which docking engine should you pick inside DockingPie?
Pick on the question you are asking, and on your operating system, because the OS constraint is real and catches people out. The official page states plainly that on Windows “its usage on Windows is limited to Vina and ADFR, since Smina and RxDock are currently not supported on this OS.”
| Engine | Scoring origin | Runs on Windows | Best first use for a student |
|---|---|---|---|
| AutoDock Vina | Vina scoring function (Trott and Olson, 2010), affinity in kcal/mol | Yes | Your default. The literature you will read mostly reports Vina scores. |
| Smina | A Vina fork with customisable scoring and minimisation (Koes et al., 2013), affinity in kcal/mol | No | When you want to rescore or minimise a pose, or swap scoring terms. |
| ADFR | AutoDockFR, built for explicitly specified binding site flexibility (Ravindranath et al., 2015) | Yes | When specific side chains in the pocket must be allowed to move. |
| RxDock | Inherits the rDock function (Ruiz-Carmona et al., 2014), also handles nucleic acids | No | Cavity-based runs, and targets that are DNA or RNA rather than protein. |
One caution on reading scores. Vina, Smina and ADFR report an affinity in kcal/mol, which is why the Results table carries an “Affinity (kcal/mol)” column. The RxDock documentation does not state the units of its total score, so treat an RxDock number as a ranking value within that run, not as a predicted binding energy you can quote beside a Vina result. Our guide on how to interpret molecular docking results goes further into what these numbers can and cannot support.
How do you run your first docking job in DockingPie?
Run a redocking job first. You take a structure that already contains its ligand, pull the ligand out, dock it back, and measure how close you landed. If the workflow is sound you should recover something close to the crystal pose, which tells you the pipeline works before you trust it on an unknown compound.
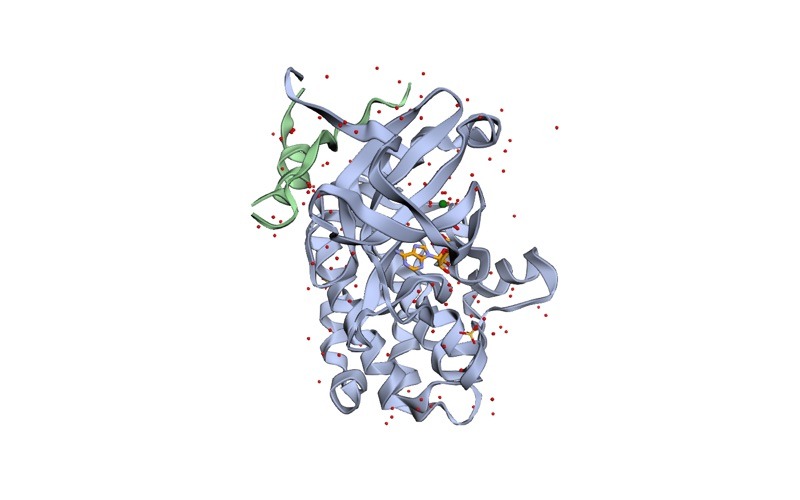
The official tutorial redocks ADP into Aurora-A kinase using PDB entry 1OL5, a 2.5 Angstrom X-ray structure of human Aurora-A bound to a TPX2 peptide, with ADP in the nucleotide pocket. The entry also carries magnesium ions, sulfate ions and more than a hundred ordered waters, which is exactly the clutter you learn to strip when you prepare a receptor. The steps below follow that tutorial exactly.
- In PyMOL: File, Get PDB, type
1OL5, Download. - Select ADP, then Action (A), then extract object. You now have the ligand as its own object, named
obj01. - Open Plugin, then DockingPie 1.0.
- Go to the RxDock tab, then the Receptors sub-tab. Click Import from PyMOL, check
1OL5, click Import. - Check
1OL5 (1) PROTEIN, click Generate receptor, select01_1ol5_RxDock, click Set. - Go to Ligands. Import from PyMOL, check
obj01, Import. Then checkobj01 (1), Generate Ligand, select01_obj01_RxDock, Set. - Go to Grid settings. Check Reference ligand method, set Receptor to
01_1ol5_RxDockand Reference Ligand to01_obj01_RxDock, click Generate Cavity. The cavity appears in the PyMOL viewer. - Select the generated grid,
prm_file0_cav1, and click Set. - Go to Docking. Available cavities:
prm_file0_cav1. Receptors:01_1ol5_RxDock. Ligands:01_obj01_RxDock. Click Run Docking. - Go to Results and double-click a row in the table to load that pose into PyMOL.
- Click Calculate RMSD, Import from PyMOL, select the original
obj01, then Calculate RMSD.
That last step is the one that matters. You are comparing your docked pose against the crystallographic ligand you removed in step 2. The plugin uses sPyRMSD, which computes symmetry-corrected RMSD, so a symmetric group flipped around its own axis is not counted as an error.
The vocabulary in the interface is worth learning because the guide uses it consistently. Receptors, Ligands and Cavities are the three inputs. Receptors and Ligands together are Objects. A Docking Scenario is one association of a Ligand, a Receptor and a Cavity.
Want the guided, hands-on version?
Our live Molecular Modeling & MD Simulations cohort bootcamp takes you from zero to running real docking and MD workflows, with a portfolio project for your grad-school applications.
How do you set the search box for Vina, Smina and ADFR?
RxDock builds a cavity. The other three engines expect a box, defined by a centre and three dimensions, and this is where most beginner runs go wrong.
In the Grid settings tab for Vina, Smina or ADFR you can type the centre coordinates and the X, Y and Z dimensions directly, or extract the centre from an object already loaded in PyMOL. Smina and ADFR add a Use as a Reference button: pick an imported ligand and the grid is built around it, then set directly in the Docking tab. For the consensus tutorial the developers use a selection of obj01 with X = 4, Y = 4 and Z = 4.
Those small numbers are specific to a redocking job where you already know the pocket and want to hold the search tight around the reference ligand. For a real blind or semi-blind run you need a larger box, and the reasoning behind sizing it is the same whether you use a GUI or a config file. We cover it in how to set the grid box in AutoDock Vina.
The Docking tab offers two protocols. ALLvsALL takes several Ligands or Receptors with a single Cavity and docks each ligand into each receptor. Custom lets you build several Docking Scenarios as groups and runs them one after another. The right-hand panel holds the engine parameters: Poses, Exhaustiveness, Energy Range, RMSD filter, Amount of Buffer and Scoring Function.
Receptor flexibility sits here too, behind the Use Flex checkbox, where you type side chains in the form Chain:ResiduenamePosition, for example A:ARG220. The guide warns that this is computationally expensive, advises against assigning flexibility to more than about four side chains, and tells you to check that the grid is large enough to contain all of them. That is receptor flexibility handled one side chain at a time, which is a different approach from ensemble docking across MD snapshots.
What is consensus docking, and how do you run it in DockingPie?
Consensus docking means running the same receptor and ligand through several engines and trusting the poses they agree on. The reasoning is stated directly in the DockingPie paper: “it is unlikely that a single approach outperforms the others in terms of reproducibility and precision.”
Keep this distinct from ensemble docking. Consensus docking varies the engine against one receptor conformation. Ensemble docking varies the receptor conformation, usually using snapshots from an MD trajectory. They answer different questions and the terms are often swapped by mistake.
The DATA ANALYSIS tab collects results from RxDock, Vina, Smina and ADFR. You need at least two completed runs from two different engines before it will do anything. The sequence is:
- Check the runs you want included in the analysis.
- Click Consensus Scoring to open the parameters window.
- Choose a method in the Consensus Score box. The official tutorial uses Average of Auto-Scaled Scores; Rank by Rank is also available.
- Set the Poses threshold to control the range of poses included.
- Optionally check Filter by RMSD and set an RMSD threshold, which pairs results between engines by geometric agreement rather than by score alone.
- Click Start, then read the interactive consensus table. In the Consensus Matrix window you can move the RMSD threshold slider and click Update Consensus Table to see how the agreement changes.
That last control is the most instructive thing in the plugin. Watching which poses survive as you tighten the RMSD threshold shows you how much of your “result” is agreement between methods and how much is one engine’s opinion.
How does DockingPie compare with PyRx and command-line AutoDock Vina?
| Axis | DockingPie | PyRx | AutoDock Vina on the command line |
|---|---|---|---|
| Interface | Tabs inside PyMOL, beside the 3D viewer | Standalone GUI | Terminal plus a config file |
| Engines available | Smina, Vina, ADFR, RxDock | Vina and derivatives | Vina only, unless you install others yourself |
| Consensus scoring built in | Yes, the DATA ANALYSIS tab | No | No, you would script it |
| Windows support | Vina and ADFR only | Yes | Yes |
| Visualisation of the pose | Immediate, the viewer is already open | Built in | Separate step in another program |
| Batch and virtual screening | ALLvsALL and Custom protocols, modest scale | Designed for screening sets | Best, scriptable to any scale |
| Cost | Free, GPL-3.0 | Free version available | Free, open source |
| Reproducible record of the run | GUI state, harder to version control | Same limitation | Best, the config file is the record |
Our honest recommendation: start in DockingPie or PyRx so you can see the grid box sitting on the protein, then move to the command line AutoDock Vina workflow once your project has more than a handful of ligands. The config file is also what you will paste into your methods section, so a thesis project ends up on the command line sooner or later. A working set of PyMOL commands for docking and MD is useful in both directions.
What goes wrong in DockingPie, and how do you fix it?
- The plugin will not open on an open source PyMOL build. The dependencies are not installed automatically there, because the Conda package manager is not integrated. Install sPyRMSD, OpenBabel and RxDock with
conda install, and check for Biopython, which the guide names specifically as a missing module that blocks the plugin from opening. - The Smina or RxDock tab will not run anything on Windows. This is not a bug. Those two engines are not distributed for Windows. Use Vina or ADFR, or move the work to Linux or macOS.
- Nothing appears in the import list. DockingPie imports from the PyMOL workspace, so the structure has to be loaded in PyMOL first. Import from PyMOL can only show you objects that already exist.
- The Check for Updates button does nothing. The guide records that this function in the CONFIGURATION tab is currently out of use. Update by reinstalling the current ZIP from GitHub.
- Undo behaves strangely on PyMOL 2.5.x. Known incompatibility. The plugin disables the undo function when it opens, and the developers advise keeping it disabled.
- A flexible side chain run never finishes. Reduce the number of flexible residues to four or fewer, and confirm that the grid actually contains every side chain you marked flexible.
- Your redocked pose has a good score but a large RMSD. The score is not the check. Use Calculate RMSD against the extracted crystal ligand, and treat a low affinity with a high RMSD as a failed validation of the protocol, not as a discovery.
Frequently asked questions
Is DockingPie free?
Yes. DockingPie is open source and distributed under the GPL-3.0 licence, with the source hosted on GitHub. The docking engines it drives are also free. You do need PyMOL, and the plugin is developed and tested against the official Schrödinger builds, though it installs on open source PyMOL too.
Does DockingPie work on Windows?
Partly. The plugin installs and runs on Windows, macOS and Ubuntu Linux, but on Windows only AutoDock Vina and ADFR are usable. Smina and RxDock are not supported on that operating system, so Windows users cannot run the full four-engine consensus analysis.
Do I need to know Python to use DockingPie?
No. The plugin is written in Python 3, but every step is a button or a field in the interface. You may need one or two conda install commands to add dependencies if you are on an open source PyMOL build, and that is the only terminal work involved.
Can DockingPie do virtual screening of a compound library?
It can dock several ligands against several receptors through the ALLvsALL protocol, which covers a small set. It is not built for libraries of thousands of compounds. For screening at that scale, script AutoDock Vina or Smina directly instead.
What is the difference between consensus docking and ensemble docking?
Consensus docking runs several docking engines against one receptor structure and keeps the poses they agree on. Ensemble docking runs one engine against several receptor conformations, usually MD snapshots, to account for protein flexibility. DockingPie performs consensus docking.
Which PDB entry should I use to practise?
PDB 1OL5, human Aurora-A kinase with ADP bound, is the entry used in the official DockingPie redocking tutorial. Because the ligand is already present you can extract it, dock it back and measure the RMSD, which validates your workflow before you dock anything unknown.
Where to go next
DockingPie earns its place by making the parts of docking that are usually invisible visible: the cavity, the box, the pose and the disagreement between engines. Run the 1OL5 redocking once, check the RMSD, then run the same ligand through two engines and open the consensus table. If you work through those two exercises you will understand more about what a docking score means than any single number can tell you.
Want the guided, hands-on version?
Our live Molecular Modeling & MD Simulations cohort bootcamp takes you from zero to running real docking and MD workflows, with a portfolio project for your grad-school applications.
Sources
- Rosignoli S, Paiardini A. DockingPie: a consensus docking plugin for PyMOL. Bioinformatics 2022;38(17):4233-4234. DOI 10.1093/bioinformatics/btac452, PMID 35792827.
- DockingPie User’s Guide, version 1.0.1, Rosignoli and Paiardini, Sapienza University of Rome.
- DockingPie official page, Department of Biochemical Sciences, Sapienza University of Rome.
- Trott O, Olson AJ. AutoDock Vina. J Comput Chem 2010;31:455-461. Koes DR et al. J Chem Inf Model 2013;53(8):1893-1904. Ravindranath PA et al. PLoS Comput Biol 2015;11(12):e1004586. Ruiz-Carmona S et al. PLoS Comput Biol 2014;10(4):e1003571.
- RCSB PDB entry 1OL5, Aurora-A kinase bound to TPX2, ADP and magnesium.